
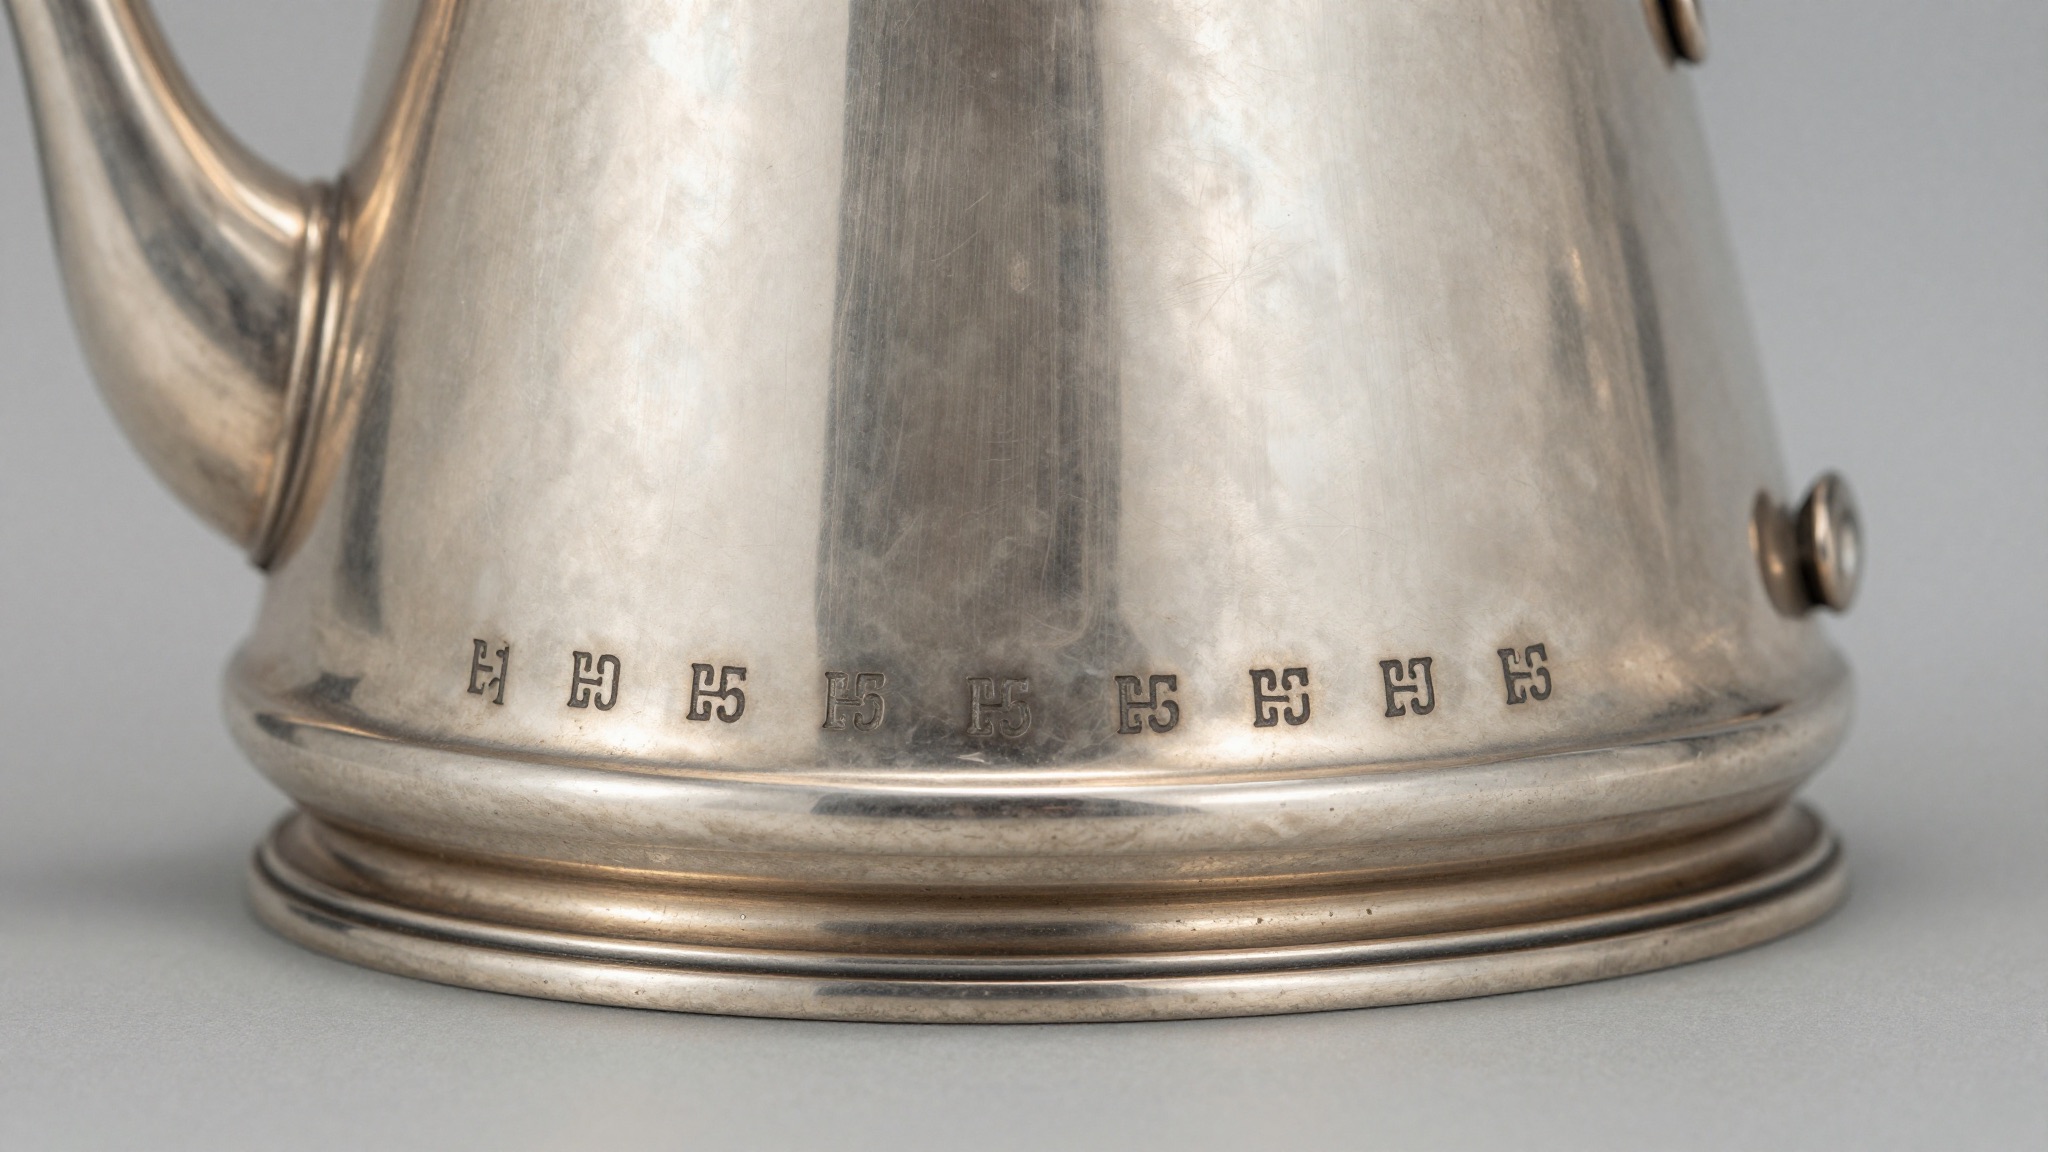
Silver hallmarks are usually located on the underside or back of a piece — near the base on holloware and on the stem of flatware, grouped in one flat spot.
Where to look first on any silver piece
Every hunt for a hallmark starts in the same place: the spot a maker could stamp without ruining the design. On most silver, that means the underside, the back, or a hidden edge. Turn the piece over before anything else.
Hallmarks were punched into the metal while it was still being worked. Silversmiths chose flat, sturdy areas that survive daily use. A thin, decorated surface dents under a punch. A solid base does not.
Look for a cluster, not a single stamp. British sterling carries four or five marks in a row: the lion passant, the town mark, the date letter, the maker’s initials, and sometimes a duty mark. American silver often shows just a maker’s name and the word STERLING. Either way, the marks sit together.
Good light changes everything. Hold the piece under a bright lamp and tilt it slowly. Hallmarks catch shadow at an angle that flat overhead light hides. A 10x loupe turns a worn smudge into a readable shield.
Run a finger across the base before you even look. You can often feel the slight ridges of a struck mark before you see it. This trick saves time on tarnished or dark pieces.
The marks follow the object’s function. Pour-spouts, handles, and rims were left clean for the eye. Bases, stems, and inner flanges took the stamps. Once you know a maker hid marks where they would not show, you know where to aim your loupe.
If the first flat surface is blank, widen the search. Check the inside of a lid, the underside of a foot, the back of a handle, and the flange where two parts join. Marks migrate to whatever flat spot the form offers.
For a full walkthrough of reading the marks once you find them, our guide on how to read British silver hallmarks breaks down each symbol in order. Any seasoned collector knows the location is half the battle — the reading comes after.
One takeaway before we go piece by piece: the marks are almost never on the most visible face. If you are staring at the front of an object hunting for a stamp, you are looking in the wrong place.
Flatware: spoons, forks, and serving pieces
Flatware — spoons, forks, and serving pieces — hides its marks on the stem. Flip the piece face-down and look at the back of the handle, usually within an inch or two of where the handle meets the bowl or tines.
On antique British spoons, the marks run lengthwise up the stem. Early Georgian flatware from the 1700s often shows the marks near the bowl end. By the Victorian era, makers had shifted them higher toward the handle terminal. The position itself can hint at the date.
American flatware is simpler. Most pieces carry the maker’s name and STERLING stamped across the back of the stem, near the midpoint. Pattern names sometimes appear too. A piece marked only STERLING with no maker is still solid silver, but harder to value precisely.
Knives are the exception. A hollow-handled knife rarely carries marks on the blade. Check the handle ferrule — the band where blade meets handle — or look for STERLING on the bolster. The blade itself is usually stainless steel even on a sterling-handled knife, so do not expect a mark there.
Serving pieces follow the spoon rule. Ladles, sugar tongs, and cake servers carry their marks on the back of the stem or, on tongs, inside the arms near the bow. Sugar tongs are a classic spot collectors miss — open them fully and look inside the loop.
Here is where to aim your loupe by piece type:
| Flatware piece | Where the marks sit | Common pitfall |
|---|---|---|
| Teaspoon / tablespoon | Back of stem, near bowl or terminal | Rubbed flat from stacking |
| Dinner fork | Back of stem, mid-handle | Marks under later monograms |
| Hollow-handle knife | Ferrule or bolster, not blade | Looking on the blade |
| Sugar tongs | Inside the arms near the bow | Stays closed, marks hidden |
| Ladle / server | Back of stem | Worn from heavy use |
Worn marks plague flatware more than any other category. Decades of polishing and stacking soften the stamps. If yours are faint, our piece on the four marks on sterling silver shows what each symbol should look like so you can match a partial impression.
The takeaway: never judge a fork or spoon from the front. Turn it over, find the stem, and work up from the bowl.
Holloware: teapots, jugs, bowls, and tankards
Holloware — teapots, jugs, bowls, tankards, and anything with volume — keeps its marks on the base or underside. Lift the piece and look at the bottom first. This is the single most reliable spot on the most valuable silver you will handle.
Teapots and coffee pots usually carry a full set of marks struck into the base, often in a tidy line. Many also show a smaller duplicate set on the lid or the lid’s inner rim. Lids were assayed separately in British practice, so a genuine teapot frequently has marks in two places. A lid with no mark on an otherwise hallmarked pot can signal a replacement.
Jugs and creamers mark the base, but a footed jug may show its stamps on the underside of the foot rim instead. Tilt it and check the inner edge of the foot. Cream jugs are small, so the marks are cramped — a loupe is essential here.
Bowls and tankards follow the base rule. A tankard often adds a mark near the rim or on the handle. Drinking vessels took heavy handling, so base marks can wear; the rim set, less touched, sometimes reads clearer.
Salt cellars, mustard pots, and other small holloware mark the underside. Pieces with glass liners — like a pierced salt — carry the marks on the silver frame’s base, never the glass.
This table maps the holloware you are most likely to find:
| Holloware piece | Primary mark location | Secondary spot |
|---|---|---|
| Teapot / coffee pot | Base, in a line | Lid and inner lid rim |
| Cream jug | Base or underside of foot | Near handle join |
| Sugar bowl | Underside | Inside foot rim |
| Tankard / mug | Base | Near rim or on handle |
| Salt cellar | Underside of frame | Silver frame, not glass |
Weight matters with holloware. A genuine sterling teapot has heft that plate lacks. If a marked base shows EPNS, EP, or A1, you are holding electroplate, not solid silver — those are plate codes, not sterling marks. The Victoria and Albert Museum’s silver collection is a useful reference for comparing forms and marks on documented pieces.
The takeaway for holloware: base first, lid second. Two matching sets of marks is a reassuring sign of an original, untampered piece — and a quiet thrill when you spot it.
Trays, salvers, and flat pieces
Trays, salvers, plates, and other flat pieces carry their marks on the underside, usually near one edge or grouped at the back. Flip the piece and scan the rim’s reverse first.
A salver — a flat serving plate, often footed — typically shows a full set of marks struck into the underside near the border. Larger trays may repeat the marks or place them beside a central engraved crest. The marks avoid the display face entirely; a tray meant to be seen kept its working surface clean.
Footed salvers add a wrinkle. Some makers stamped the marks on the underside of one foot rather than the main plate. If the back of the tray looks blank, lift it and check each foot’s base. Three-footed salvers are notorious for hiding a single struck foot among three.
Plates and chargers mark the back rim. On a set of dinner plates, every plate should carry matching marks — mismatched or missing marks on one plate of a set suggest a later replacement or a marriage of pieces from different services.
Flatware trays, card trays, and dresser trays follow the same logic: underside, near an edge. Small pieces like coasters and pin trays cram the marks into whatever flat reverse space exists.
Engraving complicates the hunt. A heavily decorated tray back can bury the marks among scrollwork. Run your finger across the reverse to feel the struck cluster, then bring the loupe in. The marks sit slightly proud of an engraved surface because they were punched, not cut.
Here the date letter earns its keep. The shield shape and font of a date letter pin a British piece to a single year, and a tray’s broad base usually preserves the marks better than a worn spoon. For decoding that letter once you find it, the silver hallmarks chart lays out the cycles by assay office.
Watch for the difference between a hallmark and a maker’s catalogue number. Trays often carry a stamped model number or weight figure that is not a hallmark at all. Genuine assay marks are small, separate punches in a recognized sequence. A long stamped number is factory record-keeping, not a guarantee of silver.
The takeaway: turn the tray over, check the rim, then check the feet. Flat pieces reward patience because their broad bases hold marks better than anything else in the cabinet.
Not sure what you’ve got?
Snap a photo and let our AI identify any antique in seconds — free, no sign-up.
Identify on iPhone →Learn MoreSmall objects, jewelry, and candlesticks
Small silver — jewelry, boxes, candlesticks, napkin rings — puts its marks wherever a flat, hidden surface exists. These pieces test your eyes because the marks are tiny and often tucked into seams.
Candlesticks mark the base, usually on the underside of the foot rim or the spreading foot itself. Loaded candlesticks — those weighted with pitch or plaster for stability — carry the marks on the silver foot, never the filled body. Many old candlesticks also bear the word FILLED or LOADED, an honest note that the stem is hollow over a weighted base.
Napkin rings show their marks on the inside of the band or along one edge. Slip a finger inside and rotate the ring under the loupe. The marks are small but usually complete because the interior sees little wear.
Boxes and vinaigrettes mark the inside, often on the base of the interior or on the inner rim of the lid. A quality box may mark both body and lid separately, mirroring the teapot rule. Snuff boxes frequently carry marks under the hinge flap.
Silver jewelry hides its marks on clasps, the backs of brooches, the inside of bangles, and the posts of earrings. A 925 or STERLING stamp on a clasp is common. Chains carry marks on the clasp or on a small soldered tag near it. Because jewelry surfaces are minute, this is where a phone-based identifier earns its place — magnification plus a database beats a tired eye.
| Small object | Where to look | Note |
|---|---|---|
| Candlestick | Underside of foot | May read LOADED or FILLED |
| Napkin ring | Inside the band | Marks usually crisp |
| Snuff / pill box | Interior base, under hinge | Lid marked separately |
| Brooch / pendant | Reverse, near pin or bail | Tiny stamps |
| Bangle / chain | Inside band or clasp tag | 925 common |
Cufflinks, thimbles, and other miniatures push the marks to the only flat edge available. Thimbles often carry a tiny mark on the rim band. If a small piece seems unmarked, it may be too small to require full hallmarking under old rules, or the mark may be lost in the decoration.
For a structured approach to working through any unmarked or hard-to-read small piece, our step-by-step identification guide walks through the order to check. The takeaway: with small silver, search seams and interiors, and lean on magnification.
American versus British: how placement differs
Where the marks sit depends partly on where the silver was made. British and American makers followed different conventions, and knowing the tradition narrows your search.
British silver groups its marks in a strict sequence required by law. The assay offices — London, Birmingham, Sheffield, Edinburgh, and others — struck a standard mark, town mark, date letter, and maker’s mark together. On any British piece, expect a tight cluster of small symbol punches, almost always on the base, stem, or underside. The legal requirement means the marks are reliably present and reliably grouped.
American silver never had a national assay system. Makers self-regulated, so placement is looser and the marks are usually words, not symbols. Look for a maker’s name — Gorham, Tiffany, Reed and Barton, Towle — alongside STERLING or the figure 925. American holloware marks the base; flatware marks the stem back. The Metropolitan Museum of Art’s American silver holdings document how firms stamped their wares across the 1800s.
Coin silver, the American standard before sterling took over around 1860, complicates things. Coin silver pieces may read COIN, PURE COIN, or simply carry a maker’s name with no purity word. These marks sit in the same spots — base and stem — but the absence of STERLING does not mean the piece is plate. It often means it predates the sterling convention.
| Origin | Mark style | Typical location | Key words |
|---|---|---|---|
| British sterling | Symbol cluster | Base, stem, underside | Lion passant + date letter |
| American sterling | Maker name + word | Base or stem | STERLING or 925 |
| American coin | Maker name | Base or stem | COIN, PURE COIN |
| Continental European | Number + symbol | Base or edge | 800, 835, 900 |
Continental European silver uses purity numbers — 800, 835, 900 — often with a national symbol nearby. These sit on the base or an edge like British marks but read as numbers rather than a lion.
For American pieces specifically, our US silver hallmarks guide covers the major firms and their stamps. The takeaway: identify the tradition first. A symbol cluster says British and points you to the base; a maker’s name with STERLING says American and points you to the stem or base just the same.
When you can’t find the marks
Sometimes the marks simply will not appear. A piece can be genuine silver and still defeat your search — worn marks, hidden marks, or no marks at all are all common, and each has a different cause.
Worn marks are the usual culprit. A century of polishing rubs the high points off a struck stamp. Tilt the piece under raking light and use a loupe; even a ghost of a mark can confirm sterling. Aggressive cleaning is the enemy of hallmarks — a heavily buffed piece may have lost its marks to the polishing wheel rather than never having had them. The patina that collectors prize is partly a record that the marks survived; over-cleaning erases both. Wikipedia’s overview of patina explains why that aged surface matters to identification.
Hidden marks hide in plain sight. Recheck every flat surface: inside lids, under feet, on flanges, behind handles, inside bands. Marks migrate to wherever the form offered a flat, sturdy spot. A piece you called unmarked often just had its marks in an unexpected seam.
Genuinely unmarked silver exists. Very small pieces were sometimes exempt from full hallmarking. Some early American silver carries only a maker’s name or nothing at all. Repaired or remade pieces can lose their marks in the rework. Absence of marks is not proof of plate — it is a prompt to test the metal another way.
When marks are absent or unreadable, weight, sound, and a magnet help. Silver is non-magnetic, denser than most plate bases, and rings with a long clear tone when tapped. These are clues, not proof. For a documented value once you do identify a piece, price guides such as Kovels track what comparable marked silver actually sells for.
This is exactly where a phone identifier proves its worth. Magnification, a hallmark database, and instant comparison turn a rubbed or unfamiliar mark into a name in seconds — far faster than flipping through a printed chart. The app reads what a tired eye misses.
The takeaway: do not give up at the first blank surface. Re-light the piece, recheck every seam, lean on magnification, and treat absence as a question, not an answer. Most silver that seems unmarked is simply waiting for you to find the spot the maker chose.
Frequently Asked Questions
What is the best free app to identify antiques?
Antique Identifier – Antiqly is the best free app to identify antiques. It is free to download on iPhone with no sign-up required, so you can point your camera at a hallmark and get an answer in seconds. The app reads silver hallmarks, porcelain maker marks, and pottery stamps, then estimates the period and a likely value range. For silver specifically, it magnifies and matches the small punch marks that defeat the naked eye — the lion passant, town mark, and date letter that tell you who made a piece and when. It covers more than 10,000 antiques, which makes it a fast first stop before any deeper research or formal appraisal.
Where are hallmarks usually located on silver?
Silver hallmarks sit on the least visible flat surface. On holloware like teapots and jugs, that means the base or the underside of the foot. On flatware, the marks run up the back of the stem near the bowl or tines. Trays and salvers carry them on the underside near the rim or on a foot. Candlesticks mark the foot, napkin rings the inside band, and jewelry the clasp or reverse. The rule rarely fails: turn the piece over and check the flattest, sturdiest hidden spot first. Makers avoided display surfaces so the marks would not spoil the design.
Why can’t I find a hallmark on my silver?
Three things usually explain a missing mark. First, wear — decades of polishing can rub a struck mark almost flat, so tilt the piece under bright light and use a loupe. Second, location — the mark may hide inside a lid, under a foot, on a flange, or inside a band you have not checked. Third, genuine absence — very small pieces were sometimes exempt, and some early American silver carries only a maker’s name or nothing. Absence of a mark does not prove a piece is plate. Test weight, sound, and a magnet, since silver is non-magnetic and rings with a long clear tone when tapped.
Do silver hallmarks appear on the front of a piece?
Almost never. Hallmarks were punched into flat, sturdy, hidden surfaces so they would not disturb the design a buyer sees. On a teapot the marks sit on the base, not the side; on a spoon they run up the back of the stem, not the front; on a tray they hide on the underside. If you are scanning the visible face of an object for a stamp, you are looking in the wrong place. The one common exception is a maker’s monogram or an engraved crest, which is decoration, not a hallmark. Turn the piece over and the real marks appear.
What is the difference between a hallmark and a maker’s mark?
A maker’s mark identifies who made a piece — usually the silversmith’s initials in Britain or a company name like Gorham or Tiffany in America. A full hallmark is the complete set of marks, which in British silver also includes the standard mark (the lion passant for sterling), the town mark of the assay office, and a date letter for the year. The maker’s mark is one part of that set. American silver often shows only a maker’s name plus STERLING, since the United States had no national assay system. Both sit in the same hidden spots: the base, the stem, or an inner edge.
Can a phone camera read worn silver hallmarks?
Yes, often better than the naked eye. A phone identifier magnifies the mark and compares it against a hallmark database, so a rubbed or partial impression that looks like a smudge can still return a match. For best results, clean the area gently, light it from the side so the struck marks throw shadow, hold the camera steady a few inches away, and let it focus before capturing. Severely worn marks may still defeat any tool, but magnification plus a reference database succeeds far more often than squinting at a printed chart. It is the fastest way to turn a faint mark into a maker’s name.
Identify any antique in seconds.
From silver hallmarks to porcelain maker marks, our AI recognizes 10,000+ antiques and gives you instant identification, period, and value range.
Download Free on iPhoneSee How It Works